Tarnish. Patina. Oxidation. Oh My!
One person’s tarnish is another person’s patina! Some personal preference is involved here so please don’t read this thinking that this is the be-all-end-all on this topic. Some people prefer tarnished silver and who am I to rain on their parade? So, if that’s your preference, keep rocking it. For me, I feel like tarnish makes silver look “dirty”. I’m all for an aged piece; be it a perfectly aged, warm silver that gradually darkens in the recesses to form a beautiful patina from years of consistent use, or a new oxidized piece that’s been polished in all the right places. Both are incredibly beautiful unless they are covered in a layer of tarnish. EW! Although one perspective could be that it’s all “dirty” to some degree, there are some differences and I’m going to talk a little about what they are.
Tarnish
Tarnish. Oxidation. Patina. They are all pretty much the same thing. It’s all surface corrosion. Some
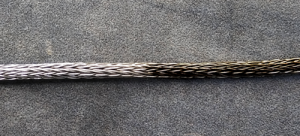
tarnish on viking knit sterling silver
discolorations of certain metals are desirable. The green verdigris on copper, for example, is highly desirable to some. That is not something you’d want to see on silver, nor is tarnish. The air, among other things, causes tarnish. In the image of the Viking knit below you can clearly see the silver is tarnished. Tarnish can be yellowish, brown, gray, or black with and without unsightly splotches. It looks dull and dirty compared to the polished piece. Not very attractive and, in my opinion, wholly undesirable. With a little elbow grease, you can get rid of it.
Oxidized silver
Silver tarnishes slowly over time. Chemical oxidation beautifully and instantly replicates the aging process quite nicely and can also give pieces a dramatic effect. Artists generally use liver of sulfur to oxidize their pieces and that’s exactly what this artist uses. Oxidation occurs on the surface layers of the silver, blackening it. The oxidation can be rubbed off easily. When polished correctly it can make a piece “pop”. Strategic polishing can draw the eye to certain parts of the piece or highlight a technique.
Patina
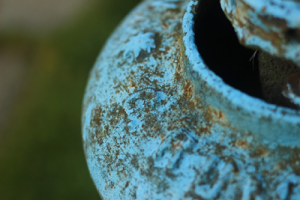
Patina – stock photo via Pixabay.com
Patina used to be primarily used when describing tarnish on copper items, especially outdoor items (image above). Its use has expanded to pretty much everything from jewelry to furniture. Chemical oxidation could be called a patina, I prefer to leave that term to others and just plainly say the piece has been oxidized. Tarnish, however, is not considered a patina. Sorry folks.
Prevention
We know tarnish is caused by air but, how do we prevent it on our beautiful pieces of art? You don’t. You read that correctly. Silver is going to tarnish no matter what you do. You can, however, slow the process, or speed it up if you’re not careful. The best way to do this is to get in the habit of cleaning your pieces after wearing them. Oils from your skin will speed up tarnish. Regularly polishing your pieces with a soft polishing cloth will slow the tarnish process as well. Don’t wear your art piece while you’re cleaning, bathing, applying make-up or lotions. Chlorinated tap water will usher in tarnish. As will sweat, wool, stainless steel and latex. Does that mean you shouldn’t wear your favorite Silver Creek pendant with your wool sweater? No. What it does mean is that when you take your art piece off, clean it. That’s all. Store it how you normally would.
Cleaning Tarnish
Even if your Silver Creek jewelry piece tarnishes, don’t panic. It’s easy to get rid of with stuff most of you already have in your home. Below are two ways that I recommend.
Let me throw out this little warning though:
**WARNING** DO NOT USE DIPS, SOLVENTS, POLISHES*
Option 1
The first way to clean your piece is with warm bottled water and a drop of Dawn dish soap. Warm your bottled water however you’d like and put it in 2 separate bowls, or any small containers you have handy. In one bowl add 1 drop of Dawn and mix with your finger. The other bowl will be your rinse water. Dip your piece into the soapy water and gently swish it around. Take it out and put it in the rinse water and swish it around. Remove it and, with your soft cloth, gently blot dry. Leave out to air dry completely. Polish with your polishing cloth and store as normal. This method of cleaning is good for after wearing your art piece and for pieces that are oxidized.
Option 2
The second way is electrochemically and works really good. Before we go on I’ve got a final warning.
**WARNING** DO NOT USE THIS ON OXIDIZED PIECES. IT WILL STRIP THE OXIDATION.
For this you’re going to need 2 shallow glass bowls, aluminum foil, baking soda and warm bottled water.
Line one of your bowls with the foil. First, heat your bottled water however you’d like and split into 2 bowls. Next, in the bowl with the foil mix 1 tsp of salt and 1 tsp of baking soda until it’s dissolved. Finally, drop your piece in the dip and let sit for about 5 minutes. Remove and immediately immerse into the clean water and swish around. Dry with a soft cloth, polish and store as usual.
With all that being said, at the end of the day you just need to remember this quote:
If the discoloration diminishes the appearance of the piece……it’s tarnish.
If the discoloration adds to the charm of the piece…..it’s patina. – Etsy User
I hope that cleared some things up for you. Here’s to untarnished silver! Be sure to check out my article on Caring for your Jewelry for info on storing and cleaning your art.